Showing posts with label design. Show all posts

Sunday, 4 January 2015

How To: Create Your Own Header

As some of you may have noticed I have a new header/background, not quite 'new year, new me' but more 'new year, time to update my blog design.' I like to update the design of my blog as it keeps things fresh and is (hopefully) something else to engage me readers!

I am currently on my third header now and it's probably my favourite one, I have a SERIOUS thing about the milky way/galaxy: the colours, lights, speckles of stars I just love it so I wanted to try and keep that theme consistent through my headers and I thought it was appropriate to my blog name too, specifically to 'MyW0rld.'

Here's my headers since I first started blogging:
So here's how I did it:

Firstly, go onto PicMonkey and click the 'Collage' section
Then, click on 'Ducks in a row' and select the one with three boxes
Save this 
Go back into PicMonkey and open up your blank collage
This is now your template for your design! I always add my text first, you can change the size and font of it
I then choose my 'Texture' aka background
Then add any extras you would like such as hearts or stars
Save this. Head to your blogger and go down to 'Layout.' Click the 'Header' box and remove your current header
Then choose your new header and tick 'Shrink to fit'
And there you have it, your new header!

I hope you enjoyed this little tutorial chums and you found it useful!

Abi :)

Sunday, 16 November 2014

How To: Get Social Media Icons on Your Blog (Blogger)

As you may (or may not) have noticed I have new social media icons WHOOP! I thought I'd write a post on how I did it as it took me a while to find out how and I am not very into the whole HTML and other scary computer whizz things haha!
Firstly, I searched 'social media icons' on Pinterest and there were LOADS to choose from! However, make sure which ever ones you choose are free unless you would like to pay for some.
Once I'd chosen the ones I wanted I downloaded them, I don't know if all of them do this but this person had kindly done duplicate copies of each icon in different pixel sizes so I could choose the ones that would look and fit best on my blog. I then went to an image hosting website I used ImageShack but you could use Photobucket or any others and uploaded the icons.

Just for ease I opened up a Word Document (any other place where you can add text is fine) and copied THIS: 
<a href="WebsiteAddressHere"><img scrc="ImageLinkHere" /></a>

WebsiteAddressHere - enter YOUR website addresses e.g your own Twitter, Facebook, Intsagram, Tumblr etc

ImageLinkHere - enter the image link from the image hosting website you're using, to do this right click on the icon you've uploaded and click 'copy link address'
Once you've done this with all of your social media and other links you wish to include go into Blogger - Layout - Add Gadget (to wherever you'd like the icons to go) - HTML/JavaScript. Copy and paste the links you've made make sure there are no spaces between the links and that the quotation marks are still there. Like this:
Add a title to the links such as 'My Social Media Links' or 'Other Places to Find Me' if you like and hit save. PREVIEW your work before clicking 'Save arrangement' just in case you're not completely happy with it. Then that should be that! I hope you found this understandable and helpful!

Abi :)

Friday, 31 October 2014

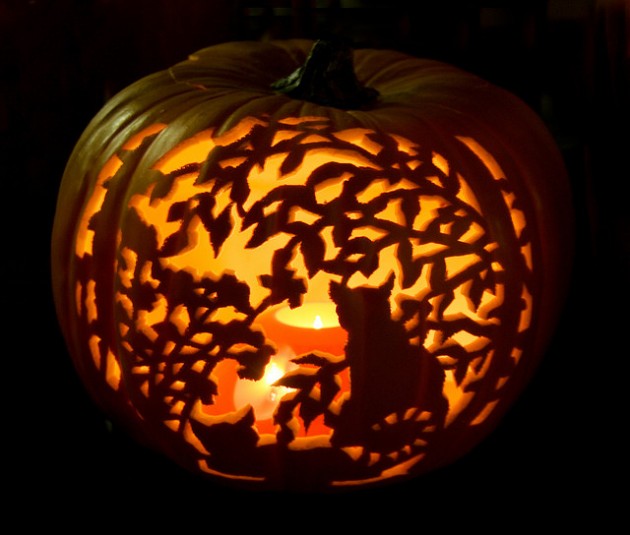
My Halloween Pumpkin!

Halloween carved pumpkin
Another photo post for you all, this time of the process of carving my pumpkin - enjoy!
Halloween carved pumpkin
Abi :)

Monday, 11 August 2014

My 2D Wooden Camera

I'm not a particularly 'arty' person, so when told that we had to design something for enrichment I really was at a loose end. After doodling ('brainstorming') for a while I came up with the idea of creating a camera which would be 2D but I'd paint it to look 3D. 

I used some fancy computer software to create my design (I honestly haven't got the faintest idea what it was) and then it somehow connected to a machine which cut the design out in wood...as you can tell I really don't have a clue about these sorts of things!
I almost didn't want to paint it - I loved it like this!
Once the machine had done its thing, I went about deciding what colours to paint the camera. First of all I wanted to paint it all different shades of blue and then thought I was probably being too ambitious and should stick with greys and blacks - the colours that cameras actually are!
It was so hard to paint all the tiny bits of detail!
There was slow but steady progress for the first few hours, I'd paint an area and then would decide the paint was too watery and then it was too thick and then I'd smudge it...but after a lot of faffing it began to look a bit more camera-like.
So many circles to paint!
Here's my final version:
As I've said, I'm not really in anyway 'arty' and didn't take Art as a GCSE or anything like that so, for me this was pretty cool and I was quite proud of myself for sticking with it and not just leaving it unpainted! 

Abi :)